
Today we are going to talk about "How to fix out of capacity error in oracle cloud". You have to do only 10 minutes of work. If you follow my advices, you can do your work without any errors. I will explain how this method works. Our error is "out of capacity" error. This means there isn't space for creating our vps in oracle cloud. But oracle cloud gives some space for creating vps in certain times. For getting this space, we need to click on "create instance" button every time because we don't know what time oracle cloud gives space. But we can't do this in real life. But we can do this using a python script. We send vps creating request to oracle cloud every 10 seconds using this script. Don't worry. You don't need any knowledge about python for this. We use launch instance option of oracle cloud api in this python script. So this method isn't a illegal thing. So you don't want to worry about this method. I think now you can understand about this method. I added some new features. There are some script available in internet written in different programming languages. There are a lot features in this script more than other scripts. These are features. Supported for creating both ampere vps and amd micro vps. Supported for multiple availability domains. Supported for specifying custom boot volume size. Supported for creating vps using old boot volume. Supported for changing ocpu size and ram size. Step by step guide for running script on 24/7 supported platforms. Script automatically set best time interval between two requests. Script automatically stop when error happened. Supported for connecting with telegram bot. If you can't understand about this, don't worry you can understand these after reading post.
Download File
You need to subscribe my YouTube channel to download file. Click on "Subscribe YouTube Channel" button below. After clicking it, you will automatically redirect to my YouTube channel. After subscribing my YouTube channel, come back here to download file. If you already subscribed my YouTube channel, just click on "Subscribe YouTube Channel" button below and come back here.
Things We Do
Now let's talk about what things we do in this post.
- Filling "create compute instance" page.
- Creating vcn and subnet (optional).
- Continue filling create compute instance page.
- Capturing request.
- Editing "bot.py" file in the script.
- Connecting the script with telegram bot (optional).
- Continue editing "bot.py" file in the script.
- Filling config file and getting oci api key.
- Preparing the script for running.
- Creating github account and github repository.
- Running the script.
- Troubleshooting errors of script.
- Additional things you need to know.
- "VPS is created successfully. Watch video to get public ip address for your vps" log.
- Things need to do after vps is created.
- Getting public ip for newly created vps.
- Enable "skip source/destination check" (optional).
- Continue getting public ip for newly created vps.
Let's start our work.
Filling "Create Compute Instance" Page

So first login to your oracle cloud account. Let's go to "create instance" page. So scroll down and find "create a vm instance" button. Click on "create a vm instance" button. Now you can see "create a vm instance" page. Let's fill this one by one. If you want, you can change instance name. Don't edit placement section. Click on edit in "image and shape" section to change vps os image and vps processor. There is two options for selecting image and shape. First one is choosing image and shape as you want. Everyone usually use this option. Second option is creating instance from boot volume. This means you had a vps before. But you terminated it without terminating its boot volume. You can create a new vps using its boot volume. You can only use this option if you have a boot volume. Special thing about this option is you can access previous vps data using this method. First let's go to first option. To change os image, click on change image button. After loading images, choose image what you want. Now click on "select image" button. If you want "amd 1 GB ram 1 ocpu processor", don't change shape. Use default shape. If you want "ampere 24 GB ram 4 ocpu processor", click on "change shape" button. Scroll down to see processor types. Click on ampere. Scroll down and select "vm.standard.a1.flex". Scroll down to change ocpu size and ram size. Increase vpu to 4 and ram to 24. Click on "select shape". I choose amd processor. So I don't change shape. Let's go to second option. Click on "change image". Click on "my images". Click on "boot volumes". You can see here your available boot volumes. Choose the boot volume what you want. Now click on "select image". Now you can see, shape is automatically changed to ampere and showing a message on screen. I will explain what is happened. This boot volume is boot volume of a ampere vps. It is why shape was changed to ampere. Message says "boot volume doesn't support to amd micro shape". So after shape was automatically changed, don't change shape again. Only change cpu and ram size as says in free tier. In this tutorial, I choose option 1 and ubuntu as image and "amd micro" as shape. But don't worry. I will explain for second option too. Now scroll down and click edit on networking section. Now we need to choose vcn and subnet. If you already have vcn and subnet, web page automatically selected option of "select existing vcn and subnet" and you can see available vcn and subnet. If not, web page automatically selected option of "create new vcn and subnet". If you haven't vcn and subnet, follow this step to create new vcn and subnet. If you already have vcn and subnet, you don't need to follow this step and wait until finish this step.
Creating VCN and Subnet (optional)

For creating vcn and subnet, we should go to networking section in oracle cloud. So click on the three pieces of stripes in left top in web page. Click on the networking in list. Click on the "virtual cloud networks" in new list. Now "virtual cloud network" web page will be loaded. You can see blank in vcn list in your page. But you can see two vcns in my page because I already have two vcns. To create vcn, click on "create vcn" button. Now we need to fill some information here. Type here any name using simple letters. Now scroll down. Copy shown ipv4 example and paste it on "ipv4 cidr blocks". Press enter or click on item of drop down menu to add it. Scroll down. Don't change these things. Now filling part is over. Click on "create vcn" button to finish. Now you can see new vcn in your list. Click on it. Vcn page will be loaded. You can see blank in your subnet list. You can see one subnet in my list because I already have one subnet. Click on "create subnet" to create new subnet. Now we need to fill some information here. Type any name using simple letters. Scroll down. Don't change these things. Copy shown ipv4 example and paste it on "ipv4 cidr block". Scroll down and click on "select a route table" in "route table compartment". Click on default route table. Scroll down and don't change these things. Click on "select dhcp options" in "dhcp options compartment". Click on "default dhcp options". Click on "select a security list" in security lists. Click on default security list. Now filling part is over. Click on create subnet. Now you have a subnet. Next click on internet gateways. Now you can see your list is empty. Click on create internet gateway. Type any name. Click on "create gateway". Now you have a internet gateway. Next click on "route tables". Click on "default route table". You can see your route rules list is empty. Click on "add route rules". Now we're going to make route rule for internet gateway. Click on "select target type". Click on "internet gateway". Type "0.0.0.0/0" in "destination cidr block". Click on "select internet gateway". Click on available internet gateway. Click on "add route rules". Our work is over for now. But we have to do a simple thing after creating vps. I will mention it in the video. Now you have new vcn and subnet. Let's continue our work.
Continue Filling Create Compute Instance Page

Choose "select existing virtual cloud network and subnet" option. Choose "don't assign a public ipv4 address" option. Don't worry. We can get ip address later. Click on "save private key" and "save public key" to download private key and public key. You want these things to access your vps. You also can choose other options, if you want. You can set custom boot volume size using this option. Default size is 47 GB. As told in free tier, total maximum boot volume size is 200 GB. Only put integer values. I don't use this option in this video. But don't worry, I will explain how to use this in script. I usually choose "use in transit encryption" option. Filling part is over. Let's go to next step.
Capturing Request

To capture request, we use developer tools in browser. For android users, developer tools is only available in kiwi browser. So install kiwi browser. First I will show steps for android users. Next for pc users. Android users, first fill "create compute instance" page in kiwi browser. After filling page, click on three dots in top right corner. Scroll down and click on "developer tools". New tab will be opened in background. You can use "control + shift + I" shortcut key to open developer tools in any browser in windows and linux. You can also use normal way like this to open it. But it's various from browser to browser. Click on "more tools" in right corner. Click on "developer tools". New page will be loaded. Now both users have developer tools. Next click on "create button" in "create compute instance" page. Now you can see "out of capacity" error message. Android users, now go to "developer tools" tab. Now both users can see developer tools like this. Now we need to go to network section in developer tools. So click on ">>". Click on network. You can see list like this. You can see "instances" text in red color in list. Keep clicking on it or right click on it. You can see menu like this. Click on "copy". Now click on "copy as curl (bash)". Now we need to save copied text. After saving text, let's go to next step.
Editing "bot.py" File in the Script

Now we are going to edit the script. I think that you downloaded and unzipped the zip file as just I told before. So go to the unzipped folder. If you are going to create "amd micro 1 cpu 1 GB ram" vps, go to "amd 1 ram 1 cpu" folder. If you are going to create "ampere 4 cpu 24 GB ram" vps, go to "ampere 24 ram 4 cpu" folder. So I go to "amd 1 ram 1 cpu" folder. Open this file using your text editor. You can see "XXXX" parts. We need to fill these parts. Let's fill "availability domains". Go back to the "create compute instance" page. Click on edit in placement section. You can see in mine, only one availability domain available. Sometime yours can have more than one. So you can use them to create vps. But sometimes you can also see message like this. This message means you can use "ad1 ad2 ad3" availability domains for creating "ampere 4 cpu 24 ram" vps. But you can only use ad1 availability domain for creating "amd micro 1 cpu 1 ram" vps. If your message is different, understand your message well. If there is not any message, you can use all availability domains. You can see text under ad1. There is text like this under ad2 and ad3 too. We need to copy this text. Next paste it on "xxxx" part of availability domains. If you can use another availability domain, you can type its text like this. First type "," and next type ' " '. Next paste text and type ' " ' again. If you can use another availability domain, you can repeat this process. But I only have one availability domain. So I use it. Now we are going to fill other values. For this, we use saved texts before. First let's fill "display name" value. You can see your saved text like this. Now search for "display name" text. You can see value next to "display name" text and between ' " " '. Copy it Fill "xxxx" part from the copied text. Next let's fill "compartmentId" value. Go back to the saved texts. Search for "compartmentId" text. You can see "compartmentId" value next to "compartmentId" text and between ' " " '. Copy it. Go back to the "bot.py" file. Fill "compartmentId" "xxxx" value from the copied text. Next let's fill "subnetId" value. Go back to the saved texts. Search for "subnetId" text. You can find "subnetId" value next to "subnetId" text and between ' " " '. Copy it. Go back to the "bot.py" file and fill "subnetId" "xxxx" value from the copied text. Next let's fill "ssh_authorized_keys" value. Go back to the saved text. Search for "ssh_authorized_keys" text. You can find "ssh_authorized_keys" value next to "ssh_authorized_keys" text and between ' " " '. Copy it. Go back to the bot.py file and fill "ssh_authorized_keys" "xxxx" value from the copied text. You mandatory need to fill these five values in every situation. But filling these three values is depends on situation. There are three different situations. First situation is you are going to create a new vps and you don't use custom boot volume size option. At this situation, you only need to fill "imageId" value. You can find "imageId" value as before. Search "imageId" text. You can find its value next to it and between ' " " '. Copy it. Go back to "bot.py" file. Fill value of "imageId" from copied text. Don't change value of "boot volume size in GBS" and value of "boot volume id". This is how you need to see these three values after editing in first situation. Second situation is you are going to create a new vps and you use "custom boot volume size" option. In this situation, you only need to fill value of "imageId" and value of "boot volume size in GBs". I showed you to how to find "imageId" value before. So I don't show it again. Now we need to fill value of "boot volume size in GBs". You need to fill "xxxx" value of "boot volume size in GBs" from value that you put in here. You also need to remove ' " " '. Don't change "boot volume id" value. After filling values in this situation, this is how you can see these three values. Third situation is you had vps before and vps was terminated without terminating its boot volume. So you need to access previous vps data. You only need to fill "boot volume id" value. So go to saved text. Search "boot volume id" text. You can find its value next to it. Copy its value. Go back to "bot.py" file. Replace "xxxx" value of "boot volume id" from copied text. Don't change value of "imageId" and value of "boot volume size in GBs". This is how you need to see after filling values in this situation. I use first situation in this video. So let's talk about these two values. These values related to connecting script to telegram bot. This is optional feature. This means if you want, you can use script without using this feature. This feature was added to script by member in telegram group. Credit for this feature goes to him. So let's see how to connect telegram bot with script.
Connecting the Script with Telegram Bot (optional)

First we need to create telegram bot. We can create bot using "bot father". Go to instructions.txt file. Copy text next to "bot father" text. Now go to your telegram app and paste copied text in the search bar. Go to first result that contains verified icon. Click on start button. Now scroll up in list and click on "/newbot". Now type name for your bot and send it. Now type username for bot. Username must contain simple letters and numbers and ending with bot. Username also must be unique. So type a complex username. Now copy token. Now go back to "bot.py" file. Now replace "xxxx" value of bot token from copied text. Now go back to your telegram app. Click on "t.me" link. Now click on start button. This is your bot. There is no messages here because we didn't start script yet. Now we need to find your telegram account id. We can do it using rose bot. Go to instructions.txt file again. Copy text next to "rose bot" text. Go back to your telegram app again. Paste copied text in search bar. Click on first result. Click on start button. Type "/id" and send. Copy id. Go back to "bot.py" file. Replace "xxxx" value of "uid" from copied text. Now we successfully connected script with telegram bot. If you don't want to use this feature, don't change value of "bot token" and value of "uid". In this video, I don't use this feature. So I don't change these values.
Continue Editing "bot.py" File in the Script

Next we are going to change ocpu count and ram size. But amd micro users can't change it. This option only available for ampere users. Ampere users can see "ocpus = 4" and "memory in GBs = 24" lines. This 4 and 24 represent 4 and 24 here. If you want to change ocpu count and ram size, you need to edit here. The maximum sizes are 4 and 24. If you used my previous script, you know there was an option to set time interval between two requests. In new script, you don't need to set it because script automatically set best time for you. Script increase time interval by 5 Seconds, if it got "too many requests" error message. This is how script works. You don't need to worry about it. Now editing "bot.py" file is over. Now save edited "bot.py" file. Let's go to next step.
Filling "config" File and Getting OCI API Key

Go to oracle cloud home page. You can see profile icon in top right corner. Click on it. Click on "my profile" to go to your profile. Scroll down. We want to get api key. So click on "api keys" in resources list. You can see blank in your api key list. But in my list, I already have one. Click on "add api key" to add new api key. Click on "download private key". Rename downloading file as "oci_private_key.pem". Click on "download". Now click on "add" to add this api key. Now click on "copy" to copy these texts. Now click on "close" because our work is done. Now you can see one api key in your list. Now we want to save copied text into config file. You can find config file in the unzipped folder. You can see config file like this. Open it using your text editor. Paste copied text here. Clear "path to your private key file #Todo" text and type oci_private_key.pem. Now save your config file. Okay let's go to next step.
Preparing the Script for Running

Now we need to move the edited "bot.py" file to where the config file and other files are. Also we need to move the "oci_private_key.pem" file that we downloaded before to where the config file and other files are. Now we are ready to run the script. You can run this script on anywhere python programming language is supported. I show you how to run this script on heroku , railway.app , windows rdp , windows local pc , linux vps and linux local pc in this video. Don't worry, I will give guide for other platforms. But I don't recommend you to run on your local pc because you need to power on your local pc until script creates your vps. So now we need to move this script to the running platform. For it we use github. I think it is the best because github support a lot of platforms. So now we are going to create github account and github repository.
Creating Github Account and Github Repository

We are going to create github account. If you already have a account, you can log into it. To create github account, you must go to "github.com sign up" page. You can see "github signup" page like this. Type your email address here. Click on "continue" button. Type strong password here. Click on "continue" button again. Type any username here. Click on "continue" button. Type "y" or "n" and click on "continue" button. Do a human verification. It's a puzzle. After finishing it, click on "create account" to create account. Github send email including code to your provided email. So go to your email messages. You can see github email like this. Click on it. This is the code what you want. So type this code in web page. After entering code, you will be automatically redirected to this page. Choose any options to these questions. Click on "continue". Choose any options in this list. Click on "continue" button again. Click on "continue for free". Now we can start creating repository. Type any name for repository using simple letters. Choose private option. Don't set repository to public after creating it. If you set your github repository to public, your oracle cloud account will be hacked. Because hackers can access your api key in github repository. If you set your github repository to public, they can hack your oracle cloud account using api key. They can do it in few seconds. So please don't set your github repository to public. Click on "create a new repository" button. Now we need to upload files to repository. Click on "upload an existing file". Click on "choose your files". Now we need to go to unzipped folder. Now choose the "bot.py" file, the "config" file, the "oci_private_key.pem" file, the "procfile" file and the "requirements.txt" file. Now click on "select". Now you can see these five files are uploading. Scroll down and click on "commit changes". Now you can see your files here. Now you successfully created github repository. Let's go to run this script.
Running the Script

Let's talk about "how to run this script". You can run this script anywhere python programming language is supported. These are main steps to running this script. First step is installing python 3 programming language. Second step is installing oci and requests python packages. Third step is running "bot.py" file. In this video, I will show you "how to run this script on heroku , railway.app , windows and linux". First let's run on heroku.
Heroku

First you need to log into your heroku account. Next click on "create new app" button. Next type any name using lowercase letters. Now click on "create app". Now you are automatically redirected to this page. Now scroll down and choose deployment method as github. Scroll down again. You can see "connect to github" button. If there isn't, it means you already connected. Click on it. Now you are automatically redirected to this page. Click on "authorize heroku" button. Scroll down again. Type name of github repository that you created before. Now click on "search". Now you can see your github repository. Click on "connect". Scroll down. Click on "wait for CI to pass before deploy". Click on "enable automatic deploys". Click on "deploy branch". Now our script is being built. You can see logs here. Now we need to start our script. Scroll up. Now click on here. You can see a "dyno" after few seconds. Click on "configure dyno". Click on "edit" button. Click on "enable" and click on "confirm". Now let's go to see logs. Click on "more". Click on "view logs". Now you can see "out of host capacity" log. This means script is working correctly. Let's run this script on "railway.app".
Railway.app

First you need to log into your railway.app account. Now click on "new project". Now click on "deploy from github repo". You can see "login with github" button. If there isn't, you already logged with your github account. Click on it. Click on "authorize railway app". Click on "deploy from github repo" again. Click on "configure github app". Now we need to give access to the github repository. Choose "only select repositories". Click on "select repositories". Now you can see your github repository here. Click on it. Now scroll down and click on "install and authorize". Click on "deploy from github repo" again. Now you can see your github repository name here. Click on it. Click on "deploy now". Now script will be automatically build and run. Click on "building". You can see logs here. Scroll up and click on "deploy". After few seconds, you can see script running logs here. You can see "out of host capacity" log here. This means script is working correctly. Now let's run this script on windows.
Windows

Same steps for windows rdp and windows local pc. But I don't recommend you to run on local pc. First you need to go to your windows system. Also we need a internet connection. First install python. Now go to "instructions.txt" file. Now you can see "python download link". Copy it. Go back to your windows system. Open your browser. Paste copied link in search bar and go to it. Scroll down. You can see latest version of python in download option. Click on it. Scroll down again. Now you can see windows installer 64-bit version. Click on it. Now windows installing file is being downloaded. After downloading, open it. Choose "add python.exe to path" option. This will help you to easily run python anywhere on your windows system. Click on "install now". This takes some time. You successfully installed python. Click on "close". Now let's download our script. Downloading private githhub repository can't do in normal way. First you need to login to your github account on your rdp. So first go to "instructions.txt" file. Copy link next to "github login" text. Now go to your rdp and paste copied link in search bar and go to the link. Log in here using your github email and password. Now click on your github repository name in list. Now click on "code" button. Scroll down and click on "download zip". After downloading file, close your browser. Now go to file manager and find downloaded file. Now unzip downloaded file. Now go to unzipped folder. Now go to available folder. Now you can see your files here. Now click on address bar. Now type "cmd" and press enter. Now you can see windows command prompt. Now we need to run some commands. Go to "instructions.txt" file. Copy command next to "install python packages" text. Go back to windows system. Now paste copied command and press enter. This takes some time. Now go back to "instructions.txt" file again. Now copy "script starting" command. Go back to windows system. Now paste copied command and press enter. Now you can see "out of host capacity" log here. This means script is working correctly. If you close this command prompt, your script will stop. So don't close this command prompt. But you can minimize this command prompt. Let's run this script on linux.
Linux

This guide works for ubuntu linux and debian linux. This guide also works for linux vps and linux local pc. But I don't recommend you to run on local pc. First go to your linux system. Now go to "instructions.txt" file. Copy "get root access" command. Go back to linux system. Paste copied text and press enter. If it asks you a password, type your user account password and press enter. Go back to "instructions.txt" file again. Copy "update packages" command. Go back to linux system. Paste copied text and press enter. This takes some time. Go back to "instructions.txt" file again. Copy "install python3-pip, screen, git" command. Go back to linux system. Paste copied text and press enter. This takes some time. Go back to "instructions.txt" file. We need github repository link for next command. Let's get it. Go to your github repository first. Now click on address bar and copy link. Now go back to "requirements.txt" file. Now remove star marks from "copy github repository" command and paste copied link. We need to set up "personal access token" in github account. Because we can't clone private github repository without it. So first go to your github account. Next click on the circle icon on top right corner. Next click on the "settings". Scroll down. Click on the "developer settings". Click on the "personal access tokens". Click on the "tokens classic". Click on the "generate new token". Click on the "generate new token classic". Type any name here. Next you can choose validation time for this token. I use default time. Scroll down. Choose "repo". Scroll down. Click on the "generate token". Okay. We successfully created token. Scroll down. Now you can see token. Click on the copy icon to copy token. Now we need to add token that we copied before to this command. Because this is private github repository, you need to paste your token between "https://" and "github.com". Now you need to add "@" sign to at the end of the token. Command is ready to run. Now you can copy this command. Go back to linux system. Paste copied text and press enter. This takes some time. Now go back "instructions.txt" file. Now copy "find copied folder" command. Go back to linux system. Paste copied text and press enter. Now you can see a folder that equal name of your github repository. Go back to "instructions.txt" file again. Now remove star marks from "go to folder" command and type your folder name here. Now copy "go to folder" command. Go back to linux system. Paste copied text and press enter. Go back to "instructions.txt" file again. Copy "install python packages" command. Now go back to your linux system. Now paste copied text and press enter. This takes some time. Some users said me that after running this command, they have a error like this. To fix this error, you need to run some commands. I show you them. Fixing error. Go back to "requirements.txt" file again. You can see "first command" under "fixing error" topic. You need to run this. After running this, your linux system will be automatically rebooted. After rebooting, get root access. Next run "second command". After running these commands, your error will be fixed. So run "install python packages" command again. Now you can see it will work without any errors. Let's continue our work. Now go back to "instructions.txt" file. Now copy "test script" command. Go back to linux system. Paste copied text and press enter. You can see "out of host capacity" log. This means script is working correctly. We just run this to test script. Type "control + c" to stop script. You know that if we normally run script, and while running, if we exit from vps, script is automatically stopped. For getting rid from this, we use tool called screen. This tool creates separate terminal called "screen" and run it in background without any error, if you are log out from vps. So let's create a new screen for our script. Go back to "instructions.txt" file again. Copy "make screen" command. Go back to linux system. Paste copied text and press enter. Now press space. Press space again. Go back to "instructions.txt" file again. Copy run script command. Go back to linux system. Paste copied text and press enter. Now you can see our script is running. Now press "Ctrl + a + d" to come back to your main terminal while running script. Now follow this steps to see logs of script. Now go back to "requirements.txt" file. Copy "go to screen again" command. Go back to linux system. Paste copied text and press enter. Now you can see this shows list of available screens. This happened because I created some other screens for other purposes before. But if you only have one screen, this command will be directly gone you to your screen. If you have more than one screen like just I have, you can see your screen previously created on the top of the list. You can see its id. For me, it is 261992. For going this screen, you need to paste previous command and add your screen's id at the end of this command. Press enter. Now you can see your script's logs. To go back to the main terminal again, press "Ctrl + a + d". We ran script on linux successfully. Now you need to know something. After you running this script on heroku, railway.app, windows and linux as I told before, you can normally exit from heroku, railway.app, windows rdp and linux vps. Because we are running script in cloud in background. But in windows rdp and linux vps, if you reboot your machine, you need to start script again. Okay, let's go to next step.
Other Option for Running Script

Now I am going to talk about other option for running this script. It is running your script on my vps. I do this as a free service. Because on heroku, railway.app like services, you need to add credit cards and also sometimes need to active some paid plan for running script. Okay, I tell you "how to do this". First you need make "git clone" command as I showed before. Next send me that command. That's it. You can contact me on telegram and discord groups. You can find links of these groups in the description of this video. But there is a limitation. I only run script for "amd micro 1 GB ram 1 ocpu" vps. Because creation time of "amd micro" vps is lower than "ampere 4 ocpu 24 ram" vps. Don't worry. After creating your "amd micro" vps, you can run script for "ampere" vps on your "amd micro" vps. Okay, let's go to next step.
Troubleshooting Errors of Script

After you ran script, if you can't see "out of host capacity" error log, this means there is some error in your script. Now we are going to talk about some common errors.
Too Many Requests

"Too many requests" error detected means when we send more messages in less time to oracle cloud, oracle send "too many requests" error to us as response. So we need to increase time interval between two requests. So script automatically do what need to do. So you don't need to worry about this error. This error message also means your script is working correctly.
"Total maximum resource succeed free tier limit" Error
If you can see "total maximum resource exceed free tier limit" log this means you can't create any more vps in this shape in free tier. Let's go to next error.
"duplicate display name" Error
If you can see "duplicate display name" error log this means you already have a vps that its name equal to "display name" value. To fix this, you need to change "display name" value.
If you have a error that I didn't tell here, you need to follow these steps to fix it. First get screenshot of that error. Next send your screenshot to me. I will help you to fix your error. Let's go to next step.
Additional Things You Need To Know

Let's talk about "how much time this takes to create your vps". Creation time depends on region of your oracle cloud account and shape of your creating vps. I tell you average creation time. For "amd micro" vps, It is 5 days. For ampere vps, it is 10 days. Next you must not run more than one script at once. Some oracle cloud account region has "out of capacity" error for "ampere" vps. But it doesn't have "out of capacity" error for "amd micro" vps. So you can use "amd micro" vps for running script. Script takes time to create "amd micro" vps less than "ampere" vps. So I recommend you to first create "amd micro" vps because after creating your "amd micro" vps, you can use it for running script for "ampere". Let's go to next step.
"Vps is created successfully. Watch video to get public ip address for your vps" Log

This is the log you are waiting. You can see this log after the script created your vps. Also your script is automatically stopped. After your vps is created, you need to do some works. Let's do those works.
Things need to do after vps is created
Deleting Script
After creating vps, we don't need script anymore. In windows and linux, you can simply delete script. But in heroku and railway.app, you need to follow some steps. Okay, first delete script in heroku.
Heroku
First you need to go to your script. Now click here. Now scroll down and click on "delete app". Copy name in the brackets. Paste it in the blank. Click on "delete app". Now it is being deleted. Let's go to Railway.app.
Railway.app
First go to your script. Now click on "settings". Now scroll right menu bar. Click on "danger". Now scroll down. Now click on "delete project". Copy text here and paste it in the blank. Now click on "delete". Now script is being deleted.
Deleting API Key
We need to delete api key that we created before. So go to place that we created it. Click on three dots. Click on "delete". Click on "delete" button.
Deleting "github personal access token"
We need to delete "github personal access token" that we created before. Go to place that we created it. Click on "delete" button. Click on "I understand. Delete this token" button.
Deleting Github Repository
First go to your github repository. Scroll right menu. Click on "settings". Scroll down. Click on "delete the repository" button. Click on "I want to delete this repository" button. Click on "I have read and understand these effects" button. Type shown text and click on "delete this repository" button. Let's go to next step.
Getting Public IP for Newly Created VPS
You can see your newly created vps hasn't public ip address. Don't worry. Let's get a public ip address. First go to your oracle cloud account. Now we need to go to your vps. So click on three pieces of stripes in top left. Now click on "compute" in the list. Click on "instances" in new list. Now you can see your newly created vps here. Click on it. Okay, scroll down. Click on "attached vnics" in resources list.
Enable Skip Source/Destination Check (optional)
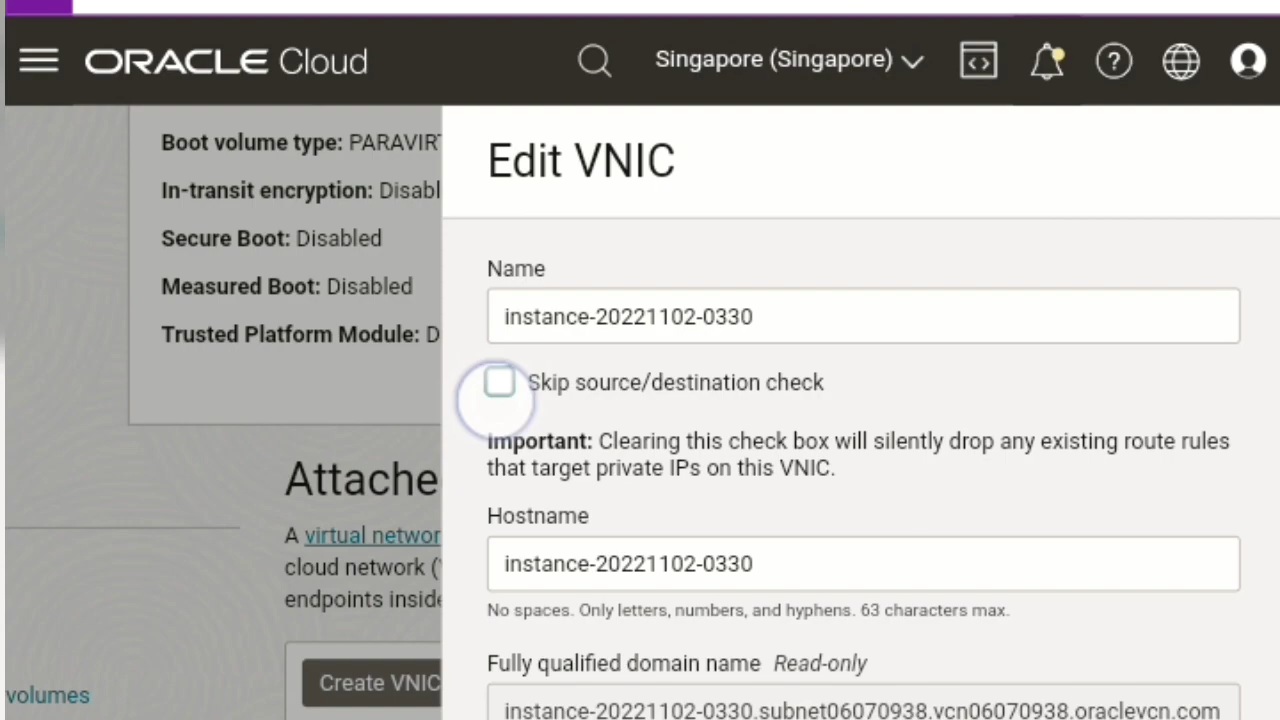
I told before users who created new vcn and subnet with me, they have a little work to do. This is it. Only do this, if you created new vcn and subnet with me. Click on three dots here. Now click on "edit vnic". Now enable "skip source/destination check". Now click on "save changes". Okay, now everyone must follow next steps to get public ip address for your vps.
Continue Getting Public IP for Newly Created VPS
Click on available "vnic" in list. Scroll down again. Click on "ipv4 addresses" in resources list. Click on three dots in available "ipv4 address". Click on "edit". Choose "ephemeral public ip" option. Click on "update". Now you have public ip address.
Tags:
Oracle Cloud
always error : Failed to verify the HTTP(S) Signature, I used 2-FA authorication, so maybe can not use this methold.
ReplyDelete